1985-1998 [Subscribe to Daily Digest] |
 | [Main 9000 Bulletin Board | BBFAQ |
Prev by Date | Next by Date | Post Followup ]
Member Login / Signup - Members see fewer ads. - Latest Member Gallery Photos
Starter Motor Procedure (long) Posted by sam96CS [Email]  (#852) [Profile/Gallery]
(more from sam96CS) on Mon, 15 Jun 2015 14:37:24 (#852) [Profile/Gallery]
(more from sam96CS) on Mon, 15 Jun 2015 14:37:24
 Members do not see ads below this line. - Help Keep This Site Online - Signup
|
This is how I removed my starter motor and installed a new one. As usual I made a lot of notes and haven't done much editing, so this is long. A lot of the steps can be done in a different order or a different way or maybe even omitted depending on your know-how, tools, etc. This procedure worked for me on a '96 CS automatic.
Park the front end of the car on ramps.
Disconnect the negative battery terminal (10 mm wrench).
Disconnect the positive battery terminal (13 mm wrench).
Remove the bolt that secures the battery to the tray (10 mm socket) and remove the battery.
Loosen the clamps on the rubber elbow that is attached to the throttle body (7 mm nuts) and remove the elbow. Removing the elbow is easier standing in front of the car. Hold the elbow in the right hand while firmly pulling out the metal intake pipe with the left hand. After the small end of the elbow is disconnected you can wiggle the elbow while pulling it off of the throttle body.
Working from above on the passenger side, remove the nut (13 mm) that connects the positive battery cable to the starter solenoid and disconnect the cable. Remove the dipstick if the dipstick's cap gets in your way. By the end of the next step I also loosened the clamp that secured the dipstick tube so I could move the tube to see better and work more easily.
Also working from the passenger side, remove the nut (10 mm) that attaches the black wire to the starter solenoid. I think this wire goes to the alternator. It is more accessible with a socket wrench. The nut wasn't tight on my car.
Remove the lower mounting nut (16 mm). It was easier for me to do this from underneath using a 5/8" wrench. Also remove the intake manifold stay, part number 4432589, which is held by the 16 mm nut. Per the Haynes manual the positive cable from the battery should be attached to this stay. It wasn't attached on my car. Sites that sell Saab parts identify this part as a brace that has something to do with the cruise control system for model years 1990-1998. Whatever. Nothing is attached to mine.
Remove the battery tray. You have no choice because the 18 mm top bolt has been there 19 years and won't budge under anything less than ideal circumstances including a massive application of torque. To remove the tray you have to disconnect things attached to the tray with 3 T25 Torx screws and 3 small bolts (8 mm). The fuse box lifts off of the tray. Four larger bolts (13 mm) must be removed to detach the tray itself.
Remove the 18 mm top bolt. I finally got it it to turn. My rig included a 6-point 18 mm socket, swivel extension, 6 inch straight extension, 25" breaker bar and a massive amount of torque. I also used PB Blaster and an impact driver that produces over 100 ft. lbs. of torque, but it was the breaker bar that finally worked. Removing this evil bolt is by far the most difficult part of removing the old starter. The automatic transmission gets in the way. Maybe this is easier if you have a manual transmission.
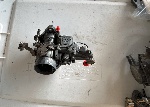
You can remove the old starter from above, standing on the passenger side. The vacuum line that runs from the intake manifold to the hooter valve is in the way, so disconnect it from the intake manifold. The starter solenoid will hang on the positive battery cable, but there is enough slack in the cable to let the starter slip through. I removed the starter "tail" first, grasping the end that is farthest from the flywheel. The starter I removed is the original part marked with Saab part number 4235610 and Bosch numbers 0001108151, 026309 and 1005821709.
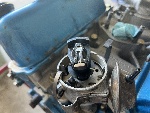
You insert the new starter motor from above, standing at the passenger side of the car. The main obstructions are the dipstick tube, the positive battery cable and the large wire loom. Line up the unthreaded (lower) mounting hole with the lower bolt and push the starter motor toward the flywheel as far as it will go. It will hang a little loosely, but it is close enough for the upper bolt to thread in cleanly. I sprayed PB Blaster on the threads of the upper bolt and set the torque wrench on 60 ft. lbs. I couldn't find a torque spec for this bolt, and the torque wrench never clicked, but I'm satisfied that it is snug enough.
Next from below the car put on the intake manifold stay, part number 4432589 (cruise control brace) then install the 16 mm nut with the 5/8" wrench and make it snug.
From above on the passenger side slip the alternator wire onto the smaller starter solenoid post and secure it with the 10 mm nut. Slipping on the wire is awkward. I did it by feel. After that I was lucky to have a 10 mm magnetic nutdriver which was very useful for installing the nut finger tight without dropping and losing the nut. I snugged it with a ratchet wrench and 10 mm socket.
From above on the passenger side slip the wire from the positive battery cable onto the larger post of the starter solenoid. Secure it with the 13 mm nut. I got the nut on by hand and ran it finger tight, then snugged it with a 13 mm wrench.
This is a good time to reconnect stuff that's reachable from the passenger side - the vacuum line from the hooter valve to the intake manifold, the dipstick tube and the dipstick.
Install the battery tray. I started by attaching the cruise control module to the back side of the tray with the three 8 mm bolts. Then I mounted the tray with the four 13 mm bolts. Then I connected the fuse box to the front of the tray. Press down on the fuse box to make sure it is fully seated - mine wasn't at first. Then I connected the fusible link (I guess that's what it is) with two short T25 screws and secured the positive battery cable with the longer T25 screw.
Install the rubber intake elbow. Wiggle it onto the throttle body, then push on the metal intake pipe at the narrow end, then tighten the 7 mm clamps.
Set the battery in the tray and lock it down with the hold-down bracket secured by the 10 mm bolt. Connect the negative cable to the negative battery post (10 mm wrench) then the positive cable to the positive post (13 mm wrench).
Look around for any tools/parts/supplies you may have left underneath the hood. After all this you are really hoping the new starter is good and that you did the job correctly. Start your engine. Yes!
Your car's computer will have to re-learn how to idle smoothly, re-run all the OBD2 monitors ('96 and later model years) and re-adapt the turbo boost.
, Mon, 15 Jun 2015 14:37:24 <-- Viewing This Message
No Site Registration is Required to Post - Site Membership is optional (Member Features List), but helps to keep the site online
for all Saabers. If the site helps you, please consider helping the site by becoming a member.
 |
 |
 |
 |
 |