1964-1974 [Subscribe to Daily Digest] |

 [Profile/Gallery]
, Mon, 11 Mar 2013 16:50:51
Members do not see ads below this line. - Help Keep This Site Online - Signup
[Profile/Gallery]
, Mon, 11 Mar 2013 16:50:51
Members do not see ads below this line. - Help Keep This Site Online - Signup
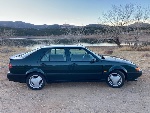
To my eye the primary 'better' of the III's is the 'small' bumper version.
Paint looks very good - maybe repainted at some time ?
Plan on rebuilds of brake master cyl., clutch master & slave, rear brake cylinders, and front calipers.
Some of these still show up NOS, or restoration by Apple Hydraulics or other to restore the bore by sleeving.
Check hoses from brake and clutch fluid reservoirs to cylinders so you don't add fliud that then runs out to the floor.
Rubber brake flex lines are probably shot as well.
Also common for clutch disc to be rusted to surfaces and won't disengage.
Make sure you understand the freewheel and don't run with it partially engaged.
If clutch is frozen and you want to run and drive before getting into significant rebuilding - with front body off you can use cherry picker to support engine and move it forward seperating bell housing from block to expose clutch from above and with prybar break clutch loose.
These cars are known for plugged gas lines from tank to engine compartment - rust sediment from the tank. Best plan is to remove the tank for cleaning and maybe interior coating. Clean, flush, clear, or replace the fuel line that runs on the floor. I have a small gas tank from a lawnmower or such that I use with a section of rubber line to run gas to the fuel pump in the engine compartment for cars with fouled fuel lines.
For the work of getting it running and brakes/clutch it helps greatly to remove the entire front body section - not a big job, and lift off easily with two people.
Look at engine schematics - there is no front 'crank' pulley. Turning engine by pulley can put loads on 'timing' gears that are known to fail.
Turn engine by rolling in gear. Important if engine is stiff and hard to turn.
Are you aware of the primary rust 'failure' in these cars is the 'rocker' panel / sills ? The exposed black metal below the doors is a three sided chamber that is the primary structure of the chassis.
They are hollow and rust from the inside out. I believe that if they seem to be intact you should drill a 2-1/2 to 3" hole in each end [ in the wheel wells ] so you can clean and treat the insides and then tastefully plug or cap the round holes.
Good luck. Please give us a report of what you find and your progress.
Bob - Portland, OR
posted by 207.118.7...
, Mon, 11 Mar 2013 16:50:51, Tue, 12 Mar 2013 13:41:48, Tue, 12 Mar 2013 14:50:15, Mon, 11 Mar 2013 17:13:35, Tue, 12 Mar 2013 09:34:26, Tue, 12 Mar 2013 09:52:03 , Tue, 12 Mar 2013 12:37:10, Fri, 15 Mar 2013 22:59:32, Sat, 16 Mar 2013 11:09:29
No Site Registration is Required to Post - Site Membership is optional (Member Features List), but helps to keep the site online
for all Saabers. If the site helps you, please consider helping the site by becoming a member.
 |
 |
 |
 |
 |