1979-1993 & 94 Conv [Subscribe to Daily Digest] |
 Members do not see ads below this line. - Help Keep This Site Online - Signup
Well, after just about going blind trying to read my 1990 900's instrument panel at night, I finally decided to attempt a fix.
First step was to visit my local junkyard and take apart a Classic instrument panel to see what I was dealing with. Here is what I found out:
1. The two stock oem 3 watt instrument panel bulbs are powered by a plastic film stuck on the back side of the instrument panel. If you attempt to use a higher wattage 5 watt bulb, this film will eventually melt due to the higher temperature of the bulb and you will then truly be in deep sewage.
2. Over the years, Saab has used two different types of bulb holder in the 900, the earlier (used up until about 1988 or 1989 I believe) holder is round and has serrated edges; the newer holder has a rectangular piece on the rear to grab onto when you turn the bulb holder in the bulb opening. This later style holder also has two metal pieces on the side of the holder, and this style is the one to use in this project. My 1990 900 had the newer style bulb holder
Now, here is how I significantly brightened the output of my instrument panel bulbs:
1. Remove the left side speaker grill with a small torx driver. Pull the grill and attached speakers out.
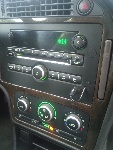
2. Look through the windshield and locate the two instrument panel bulbs; they are the highest bulbs in the IP, and closest to the center of the IP.
Twist the bulb holder and remove the two bulbs.
3. Using a cotton swab dipped into alcohol, insert the swab into the IP bulb opening and move it around to clean the rear surface of the IP where the bulb is mounted.
4. Using the newer style bulb holder (either from your car or from your local junkyard), solder a 16 or 18 gauge wire to each side (red and black color suggested here) of the bulb holder. Take a small length of electrical tape and wrap it around the solder connection that you have made on the bulb holders.
5. Run the other end of the wire (which you have just soldered to the bulb holders) outside of the speaker grill, next to the dash and out through the drivers side door to the fuse box under the hood. Attach the other end (red wire) of the wire used to the fuse for the instrument panel using a fuse tap connector (available in most auto stores). Attach a round electrical connector to the second wire (black) and attach this end to a ground (there is a nice 10 mm bolt on the inside of the fender by the fuse panel that is convenient).
6. Use a mirror held by the speaker grill to be able to see the rear of the instrument panel. Using either a fingernail or a small knife or screwdriver, peel back the plastic film from the open bulb opening (there will be two plastic pins sticking out on either side of the bulb opening, so be sure to get the film off of these pins.
7. Using a 5 watt wedge style bulb (I used a pair of the PIAA Super White #151 5 watt bulbs (got from a local speed shop) and they are very good and bright - $15.00 for two bulbs), insert the new higher wattage bulbs into the bulb holders that you have wired into the fuse box. Turn the key on to verify that the bulbs light up and that your wiring is ok.
8. Insert the bulb holders into the holes, making sure that you have the plastic film behind the bulb holder, then twist the bulb holder until it is solidly in place.
9. Once again, turn the key on and now enjoy the much improved brightened instrument panel!
Keep in mind that the above procedure effectively takes the rheostat that controlled the level of "dimness" of your instrument panel out of the picture, so you cannot dim the instrument panel from its improved brightened level.
I hope that the above info is of assistance to other 900 owners who would like to have a brightened instrument panel.
posted by 67.82.40...
No Site Registration is Required to Post - Site Membership is optional (Member Features List), but helps to keep the site online
for all Saabers. If the site helps you, please consider helping the site by becoming a member.
 |
 |
 |
 |
 |