1979-1993 & 94 Conv [Subscribe to Daily Digest] |
 | [Main C900 Bulletin Board | BBFAQ |
Prev by Date | Next by Date | Post Followup ]
Member Login / Signup - Members see fewer ads. - Latest Member Gallery Photos
How To Replace Your Pre-Pump Posted by Saana88 [Email]  (#207) (#207)  [Profile/Gallery]
(more from Saana88) on Mon, 18 Jun 2007 20:50:18 [Profile/Gallery]
(more from Saana88) on Mon, 18 Jun 2007 20:50:18
 Members do not see ads below this line. - Help Keep This Site Online - Signup
|
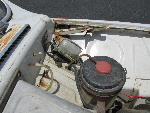
I have to write this down before I forget it. I just replaced the pre-pump and strainer on my '88 900. Symptoms of failure are a low-frequency hum or groan coming from the fuel pump assembly below a quarter tank. A replacement pre-pump and strainer will cost $45 for the pump (AC is the original equipment manufacturer) and $23 for the pickup and strainer disc.
Remove the trunk floor by unscrewing both T-10 Torx screws holding the wooden floor in. Unlatch and flip forward the spare tire cover part, then pull the floor rearward and remove it.
Remove the metal cover (the larger of the two) over the fuel pump assembly.
Disconnect the two wires from the main fuel pump by squeezing the tabs on the connectors and pulling upward.
Disconnect the fuel line from the fuel pump check valve by holding the valve body stationary with a 17 mm wrench and gently loosening the cap nut with a 19 mm wrench. Remove the cap nut, upper sealing washer, fuel line banjo fitting, and lower sealing washer. Fuel will be expelled at this step. Keep the work area clean and have a fire extinguisher nearby.
Loosen the hose clamp holding the rubber bellows to the top of the fuel tank. I used a 7 mm socket and a quarter-inch-drive three-inch flexible extension. This flexible extension is not required, but it has become the third most valuable tool in my collection. (The other two are bicycle tools.) Get it good and loose and slide the hose clamp up and out of the cavity.
Work the rubber bellows free, and (holding the connectors and fuel line out of the way) pull the fuel pumps assembly out of the fuel tank, doing your best to drain all gasoline back into the tank. When the pumps' assembly is halfway out, you will see the rubber fuel return line. Disconnect it with needle nose pliers from the plastic supply sump. The wires for the prepump are pretty long.
After the pumps' assembly is all the way out of the tank and the supply sump is drained back into the tank, disconnect the two T-5 screws holding the pickup sock and prepump to the sump. The only other place you've seen those screws is holding your front speaker grilles in place.
Now is a good time to assemble the new prepump and filter screen. The two parts press-fit together.
After those, loosen the wire connections to the prepump. Use a 6 mm wrench because the thick shoulders of a socket will not grip the bolt properly. I transferred the connections over one at a time so the order is preserved.
Next, pull the old prepump out of its friction fit in the sump and put the new one in its place. Thread and tighten the two Torx bolts holding the pump and pickup screen in place.
Reconnect the fuel return hose.
Noting the chassis number of the car and the diagrams in the (Bentley page 234-10 for 16 valve and 234-10 for 8 valve, Saab 2:3 233-5) service manuals, align the fuel pumps' assembly correctly, refit the large band clamp and tighten it. It is appropriate to mention that my car ('88 chassis J002290) was fit incorrectly according to both manuals. I saw no problems and have made a habit of putting 16.7 gallons of fuel in my 16.6 gallon tank. Either way, the pump had been in there for 218,000 miles so I have no complaints. I'll post an update when I get well below a quarter tank again.
After the assembly is back, put in a new sealing washer (eE size small) and then the fuel line banjo fitting and another new sealing washer, then hold the check valve steady whilst tightening the cap nut. Reconnect the wires to the main pump. The black wire will connect to the black terminal and the yellow wire to the whitish one.
Start the car and check for leaks. Whenever I depressurize the fuel system on my 900s (for example, when changing the fuel filter) I switch the key to the run position a few times until I hear the check valve making normal noises as the system comes up to pressure again.
If you have no leaks, put the metal cap and trunk floor back in and test drive. My '88 was pretty frisky on this test drive, so maybe I did something else by changing the pump too. Saana's happy again!
The entire operation took me half an hour, and I've never opened that up before. Around a third of the time I was thanking whichever Swedish engineer decided to use plastic fuel tanks on 900s because that other car company used metal tanks with a metal ring that would rust out and never seal again and make replacing the prepump involve replacing the fuel tank at the same time. And mine get better gas mileage...
Except for the heat shield and leaky slave. Work in progress.
I hope this helps somebody. There you have it.
, Mon, 18 Jun 2007 20:50:18 <-- Viewing This Message , Tue, 19 Jun 2007 04:59:29, Tue, 19 Jun 2007 18:51:04
No Site Registration is Required to Post - Site Membership is optional (Member Features List), but helps to keep the site online
for all Saabers. If the site helps you, please consider helping the site by becoming a member.
 |
 |
 |
 |
 |