1999-2009 [Subscribe to Daily Digest] |
 | [Main 95 Bulletin Board | BBFAQ |
Prev by Date | Next by Date | Post Followup ]
Member Login / Signup - Members see fewer ads. - Latest Member Gallery Photos
A productive day... Posted by Greg Bender [Email]  (#1027) [Profile/Gallery]
(more from Greg Bender) on Sun, 23 Sep 2007 16:15:25 (#1027) [Profile/Gallery]
(more from Greg Bender) on Sun, 23 Sep 2007 16:15:25
 Members do not see ads below this line. - Help Keep This Site Online - Signup
|
Hi all,
I got a lot accomplished today on my 2000 9-5 SE. I had dealers perform the 30,000 and 60,000 mile service, but I wanted to give it a go for the 90,000 miles service. I'll still pay someone to flush the coolant and transmission fluids, etc.
Early this morning (before the family was out of bed), I was able to get the following things done in about 1 hour, 45 minutes (at a leisurely pace):
- New sparks plugs...quick and easy. Cost = less than $2 each.
- New air filter. It took me a minute to find it under the right front bumper, but changing it out was a snap. I used a Purolator filter. It looks like it will do the job just fine (although it doesn't look as good as the original Saab part that was in it). Cost = $10.
- New cabin air filter. I used the excellent instructions I found here. It takes a bit of time to get to, but I was done in less than an hour. I'm sure I could do it faster next time. I used a Beck/Arnley replacement. Came with the foam piece that I fit in place (the previous dealer service did not fit the foam piece). Cost = $28.
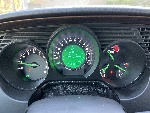
Later this afternoon as my daughter napped, I decided to fix the dash back lights that had gone out behind the speedometer. I'd never been inside the dash before, but I found some general directions here that allowed me to get it all taken care of in about 1 hour, 45 minutes. Again, next time it would go a lot faster. Here is the procedure I used to get to the dash back light bulbs:
1. Unhook the negative battery terminal.
2. Insert the DIN removal tools (purchased from WalMart for $3.97) and removed the radio.
3. Reached inside the radio opening and pushed the Automatic Climate Control (ACC) out. Unplugged the wire from the back.
4. Reached inside the radio opening and pushed the SID out. Unplugged the wire from the back.
5. Removed the steel radio box. I was able to get the left side pried out...then the right side came pretty easy. Once it was out, I removed the wiring from the back.
6. Removed the Traction Control System (TCS) plug.
7. Removed the headlight switch. I was able to gently pry it out with a small screwdriver.
8. Removed the fog light switch.
9. Moved the steering wheel as far forward and downward as possible.
10. Removed the top half of the plastic piece that goes around the steering column. There are 2 (two) screws that are accessible when the steering wheel is turned to the right and left.
11. Removed the bottom half of the plastic piece that goes around the steering column. There is 1 (one) screw in the bottom middle.
12. Removed the 6 (six) screws that secure the wood grained dash. 4 (four) of the screws are accessible through the SID / Radio / ACC hole. The other 2 (two) are accessible through the headlight switch hole.
13. Once the screws were removed, the dash still seemed securely connected in the middle. I took a long time trying to find additional screws, but I couldn't find any. I finally decided that there were no additional screws and I started to pull the dash out. I placed a hand behind the dash and put outward pressure as near as possible to the location where the most resistance was felt. Sure enough, the dash popped out. It took a lot more force than I was expecting to need to give, but it all worked out great and I didn't break anything.
14. I removed the four screws that secure the flexible vinyl piece surrounding the steering column. Once the screws were removed, I just moved the piece downward a bit.
15. I removed the four screws securing the dash in place. I withdrew the dash and unplugged the connections.
16. I removed all of the visible screws on the back of the dash except for the one screw that was securing a piece of metal (the others all went directly into the plastic.
17. Once the screws are removed, there are 2 (two) plastic clips on other side that must be depressed...then the back cover can be removed.
18. With the back cover removed, the bulbs are still not directly accessible. At the top, there is a single ribbon connector. I pulled up on either side of the plastic piece...then the ribbon pulls straight out.
19. I hinged open the back to reveal all of the bulbs.
20. I twisted out the two bulbs that had gone out (circuit board is nicely labeled). I removed each bulb from its socket. It is just a push in bulb, so they came out easily (I use a thin piece or rubber to get a better grip on the bulbs). I found suitable replacements in my stash of parts from other vehicles (a 1985 Saab 900, IIRC).
21. Rather than simply put in two new bulbs, I decided to swap illumination bulbs with warning light bulbs. My rationale is that the illumination bulbs are on all the time (with the daytime running lights) and that the warning lights see very little use. So, hopefully this will keep things properly illuminated for another 90,000 miles. (fingers crossed)
22. Assembly is essentially the reversal of disassembly.
That's all for now...hope this information is helpful!
Regards,
Greg Bender
posted by 24.73.25...
, Sun, 23 Sep 2007 16:15:25 <-- Viewing This Message, Wed, 26 Sep 2007 06:12:56, Wed, 3 Oct 2007 13:14:32, Mon, 24 Sep 2007 07:36:00, Mon, 24 Sep 2007 17:31:33
No Site Registration is Required to Post - Site Membership is optional (Member Features List), but helps to keep the site online
for all Saabers. If the site helps you, please consider helping the site by becoming a member.
 |
 |
 |
 |
 |