1985-1998 [Subscribe to Daily Digest] |
 | [Main 9000 Bulletin Board | BBFAQ |
Prev by Date | Next by Date | Post Followup ]
Member Login / Signup - Members see fewer ads. - Latest Member Gallery Photos
Re: Door locks: Sender, controller, actuator?  1 Saabers Like This Post! 1 Saabers Like This Post!
Posted by sam96CS [Email]  (#852) [Profile/Gallery]
(more from sam96CS) on Sat, 5 Apr 2014 04:42:22 (#852) [Profile/Gallery]
(more from sam96CS) on Sat, 5 Apr 2014 04:42:22

In Reply to: Door locks: Sender, controller, actuator?, Twinsdad, Fri, 4 Apr 2014 21:52:30 Members do not see ads below this line. - Help Keep This Site Online - Signup |
You're right, the controller in your parts car won't be any better.
When you're driving the car the controller is located in the space above your left knee. Here is the procedure:
PROCEDURE FOR WORKING ON THE CENTRAL LOCK CONTROLLER
00. First check that the fuse 16 for the central locks is good. This fuse also powers the interior lights. If the interior lights work, then the fuse is good. Remove this fuse before disconnecting the controller so that the controller will be unpowered when you disconnect and reconnect the wiring harness. Also remove fuses 19 and 22. Note that removing these fuses also disables the alarm system.
01. Under the dash on the driver's side, remove the cardboard piece wrapped in black carpet that is held in place with 4 button fasteners. To remove a button fastener, force a small jeweler's screwdriver alongside the central pin and use the screwdriver to pry the head of the pin out about 1/8". You don't pry as much as force in the screwdriver, which makes the pin pop out a little. This is a PITA. Use needle nose pliers to pull the pin all the way out and then the button fastener. Some owners remove the cardboard piece permanently because it is not essential and impairs access. Others replace it but secure it with only a couple of the pins. The 1990 and earlier model years had an earlier generation of fasteners that used philips head screws and will work on a '96 - much easier to use.
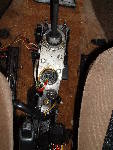
02. The controller is a black plastic box that is about 4-1/2" x 2" x 1-1/4" thick. It is held by a metal spring clip similar to the clip that holds a furniture lock barrel. The clip is oriented with the open end facing the driver's seat. The controller is oriented with the harness towards the brake pedal. Slide off the clip. Pull off the electrical harness. The harness is keyed so it can only be installed the correct way. The controller is SAAB part 4102851. It is made by Kiekert and is also marked D6 and 40505359.
03. Use a small screwdriver to scrape the corrosion (looks white) off of the electrical prongs that contact the harness. Wedge a knife between the two tabs and tab retainers that hold the board inside the plastic case. Pry out with a small screwdriver, hopefully without breaking any tab retainers.
04. Reflow the solder at the 6 pins that hold the two relays to the board. Also reflow the 6 pins located below the relay pins, the bottom 4 relate to the coil and the middle two are related to the relay. The relays are Siemens part number V23083-C1002-A303, and they're also marked, GN6ME. Each has 6 soldered pins. The solder is covered with a brass-colored resin that must be scraped off with a pocket knife before reflowing. The pins won't necessarily look like they need to be reflowed. Reflow them anyway because the heat may reflow connections inside the relays that you can't see. See excellent pictures of the pins and procedure at the link below.
05. Reassemble the controller and reinstall it (see step 02 above for the orientations of the controller and clip). Insert the 15A fuses at #16, #19 and #22. The controller should work now even though the reflowing doesn't seem to change anything. If it works, then install the carpeted kick panel if you wish. Go to step 06 if still no joy.
06. Reflow the solder joints that correspond with the connector pins. Go back to step 05.
Central lock controller procedure
, Fri, 4 Apr 2014 05:07:45, Sat, 5 Apr 2014 04:42:22 <-- Viewing This Message 1, Wed, 2 Apr 2014 10:03:08
No Site Registration is Required to Post - Site Membership is optional (Member Features List), but helps to keep the site online
for all Saabers. If the site helps you, please consider helping the site by becoming a member.
 |
 |
 |
 |
 |