1994-2002 [Subscribe to Daily Digest] |
 Members do not see ads below this line. - Help Keep This Site Online - Signup
Copyright 2004 Kyle Morley. All rights reserved.
Replacing the clutch cable is a short, but fussy job. It took me a bit over two hours, but then I hate working under dashboards, am terrified of electrical stuff, and spent a lot of time pondering my next move to make sure I didn't screw anything up.
I can only take a little credit for these instructions - they incorporate tips ruthlessly plundered from a number of sources, mostly the SaabNet NG900 board. My thanks to all who have contributed them. Please feel free to comment on these instructions, and I'll update them to include any corrections or refinements.
Tools needed are a
- Torx screw driver
- 1Omm socket and drive
- Pry bar
- Light
- Homemade spring holding tool (8" or so piece of fairly sturdy coathanger or similar wire bent with a small hook on one end and a larger one on the other.
- adjustable strap, rope/cord or bungy.
- Saab grease 87 81 718 or other good waterproof grease.
- Screwdriver or two and maybe a pliers for prying and holding things.
And of course a new clutch cable. The feeling seems to be that clutch cables are such a pain on these cars that one should use only genuine Saab/OEM, though Scantech has a manually adjustable aftermarket version which The Saab Site carries. Opinions on the manually adjustable version have been mixed, with several users saying it does not hold its adjustment well but others saying it works more smoothly (if properly lubed!) than the stock one.
UNDER HOOD
To get access to the cable where it goes through the fire wall it is first necessary to partially remove the the fuse/relay box on the drivers side of the engine compartment so it can be swung out of the way. First remove the top, then undo the power connnector to the hood switch.
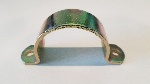
The box has a stub on the bottom which rests in a rubber socket, and is held down by just two metal clips which slide into channels on the box, one on the shock tower and one on the the rain gutter wall, and a nut down by the hood switch (actually, there are two nuts here; the one to undo is the rearmost of the two). The clips look similar but are undone differently. On the one on the shock tower the box is slid off the metal stub after pushing the release tab. On the one of the rain gutter the metal part stays on the box, and is pried off the gutter wall (easiliest done by prying it with a screwdriver from the back).
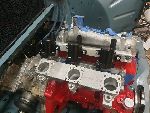
Then detach the the clutch cable end from the clutch lever on top the tranny case. this is easiest done by sticking a prybar down behind the lever so the end sticks down into the gap between the the tranny case and the steel mount, and pushing towards the firewall, taking care not to slip and damage the distributor cap in the process. With the clutch lever compressed, the cable end can be easily slipped out of the fork. Next undo the cable housing end from the stop on the tranny housing - this pulls out not up, but backwards, by pulling the side with the cable housing and rubber thingee towards the firewall.
UNDER DASH
Remove lower dash panel. This has two torx screws at the front, one on the lower right side (LHD car) , a 10mm bolt on the lower left side, two torx screws at the center that also hold the diagnostics plug and cover, and three torx screws under the fuse box door (don't miss the lower one, it's easy to overlook. There are also two plastic clips holding large plastic washers towards the back by the pedals: these are what I call "death clips" since I have never found a way to remove them without destroying them.
Before you can remove the panel it is also necessary to to loosen the fuse box on the end of the panel order to work the underdash panel free at the end where it tucks behind it. This is done by loosening or removing the two T screws recessed at the top (not the hex bolts).
With the fusebox loosened the lower dash panel can be removed, with inevitable carnage of the death clips. Remove any leftover bits of the death clips where they clip in so new ones can be installed later.
Now you will see the ribbed knee shield. This is held on by 2 hex bolts which are removed with a 10mm socket.
With the knee shield removed you will see two plastic air ducts, a small one on the bottom and a large one above it. These must be removed to gain access to the pedal. Watch out for the two switches on the brake pedal bracket, both now and thoughout the job, as these are easily damaged and can be a pain to troubleshoot later.
The smaller, lower, duct is removed by undoing a single T screw which goes into the bottom of the fuse box. The other end simply slides/snaps over a stub.
The big duct is simply snapped on each end, but clearances are very tight, and it is easy to do damage, to the dash vent fitting especially, by flailing around too vigorously. If you haven't already, finish undoing the T screws at the top of the fuse box so it can be swung aside. Some people recommend removing the big white electronics box underneat the duct so the duct can be pushed forward. This will make removing the duct much easier, by allowing it to be pushed further forward, but opens another can of worm since it is not easy to reach the screws to release to box, to say nothing of getting them back in afterwards.
By working carefully, and slightly deforming the end of the duct that connects to the dash board vent it's possible to get it unhooked at the dash vent end, after which the other end can be easily pulled off and the duct swung aside. There is some wiring clipped to the duct. You may prefer to unclip it so the duct can be competely removed, but I found the duct can be swung aside with the wiring still attached enough not to be in the way.
With the duct removed you should be able to see the hook at the top of the pedal and the white plastic cable end both almost hidden inside the pedal bracket, with the end pedal spring, whcih is bent to fit around the cable end, holding it in place.
Take the coathanger hook and hook the small loop under the spring, just below where it contacts the white plastic cable end. The loop may require some fine tuning to get it to fit. Tie the other so it pulls the spring back, allowing you to use one hand to manipulate the cable end and the other the pedal, without having to worry about the spring. Most directions say to tie the hook to the steering wheel, but I found tying it to the seat adjuster bar worked better since the lower angle pulls the spring further out of the way. I also found using an adjustable strap worked better than the usual bungy, because it can be adjusted precisely to get the spring in just the right spot where it is least in the way.
Now lie on the floor of the car so you can reach behind with your right hand and manipulate the cable end, while operating the pedal with your left. A small flashlight that can be held in your mouth is very handy at this point. Pull the pedal out all the way and flick the cable end off the hook. This may take a few tries. You cannot get the cable off (at least I couldn't) with the pedal down on the floor so the pedal hook and plastic cable end are towards you - the bracket gets in the way. the pedal has to be mostly up so the hook is back and clear of the bracket. Some people suggest removing the pivot bolt and removing the pedal to get better access to the end, but you are really asking for it if you attempt this since access is not very good and it can be very hard to get all the parts together again - It just isn't that hard to get the cable end on and off without taking apart the pedal if you use the hook trick, just a matter of trying one thing or another until you find what works, The cable end seems to go on best if the cable is bent so the end of the cable end is angled downward as it is bought down onto the hook on the pedal.
UNDER THE HOOD AGAIN
Once both ends of the old cable are free, pull out the cable from the fireway and, noting carefully it's route so you can get the new one in the same way, remove it from the car, and put the new cable in it's place. Be careful not the bend the bracket which holds the cable midway; it effects the proper operation of the cable, as explained in the Saab SB.
A lot of folk have found this this actually the most difficult part of the job because there are a couple of immovable pipes and such down there, and those big rubber thingees on the cable take a lot of room to get through. It's easiest to get the old cable out by snaking it out towards the front of the car, and put the new cable working from the front to the back - the rubber thingees on the pedal end are a tiny bit smaller than the ones at the clutch lever end, but that tiny bit makes all the difference between go and no go! Some directions say to remove the battery for better access, but I haven't found that necessary.
Put a big dollop of white or silicone grease in the slot on the cable end so you won't forget later, and push the cable in through the firewall. But before you install the cable you might want to consider greasing it better, since they seem to come through only lightly lubed (I didn't, but wish I had now after playing with the old cable), and doing the "extra washer" trick. Note that the rubber sleeve that actually makes the fit in the hole in the firewall is fairly flimsy, and if you force the end in too roughly or crookedly it may ride up and mess up the fit in the hole resulting in erratic cable operation. Lubricating the plug with a bit of saliva works well; I avoided grease since I don't think it's desirable that the plug be too able to move around once it's in place.
BACK UNDER THE DASH
Now get back under the dash again and, working in the same manner as you did to undo the old cable, hook the new one over the hook on the pedal. I found this quite easy, just a matter of messing with the pedal and the end until one (intentionally or accidently) does the reverse of whatever one did to get the old one off.
Once it's hooked you can loosen the strap/bungy/rope and remove the hook tool so the pedal spring will hold the cable end on the pedal so it can't accidently come off.
AND THE HOOD
Under the hood again. Neaten up the cable run as much as possible, slide the fitting on the lever end of the cable housing into the stop on the tranny case, pull the lever end to remove all the slack (you'll find that the spring will give you some play and take it back immediately you let go, this is normal), lubricate the nylon pivot block copiously, use the pry bar to lever the clutch lever towards the firewall as for removal, and snap the cable end/pivot block into position on the lever. Ascertain that the white rounded pivot block on the end of the cable is free to pivot in the arm.
Slip the rubber sleeve midway on the cable casing into position on the bracket, paying attention to be sure that cable is not pulled too tight between the bracket and the firewall, but makes a graceful arch as per Saab SB 410-1976 to allow for future (self)adjustment.
Refit the underhood fuse box, in reverse of how it was removed.
Work the pedal a few times so it will adjust, and if it doesn't, do all the usual tricks as necessary. You might want to take it for a drive now, before you put all the dash bits back together, to make sure everything is OK. I drove mine this way for a couple days, until I was confident everything was working right.
Reassembly of the underdash trim is in reverse of dissassembly. The biggest hassle is getting the big duct over the end of the dash vent, especially because you probably will have put some kinks in the end of the duct while you were getting it out that will come back to haunt you now. However, this is just a matter of fiddling until it is right.
When the big duct is on, put the fuse box in position, but only tighten the screws lightly so you'll be able to wiggle it around when putting the lower panel in. Put the small duct in place, and fasten the screw that holds the outside end to the fuse box.
BTW while the torx screws you have encountered on this job look almost identical, there are actually two kinds. The ones with the wider heads are generally used where the screw is bearing directly on bare, soft plastic, like the duct and the lower panel, and the smaller heads where the heads rest on hard plastic or metal.
Reinstall the knee panel on. The two bolts holding it go in deep recesses, and if they fall out of the socket before they catch it may be necessary to remove the panel to shake them out. Using a little tape to hold the bolt in the socket will avoid this.
Finish up by reinstalling the underdash panel, taking care to properly locate the diagnostics plug, then finish tightening the fuse box screws. Install new death clips as needed.
NOTES:
- I always find it a lot easier to work under a dash if I rig some sort of platform to lie on. In this case I did it with a scrap of plywood and a couple milk crates outside the door, with a scrap of foam on the floor inside the car, so I could lie semi-comfortably on my side with my shoulder on the sill or car floor. I also found a small AA flashlight (in this case a 7-LED Powerstream - what a great light!) that I could hold in my mouth invaluable, especially for unclipping and clipping the inner cable end on the metal, since a drop light will only get in the way, and it's very hard to illuminate the area using a larger light without the light itself blocking one's view - especially if you are trying to get by with only two hands.
- Saab recommends using a special, expensive Saab silicone lube for the cable ends. However, if you look at the Saab SB for the double-washer mod you will notice it says to use Molycoat or silicone lube "sourced locally from a marine supply store". This suggests the Saab lube is not some special, super-trick magic lube, and the reason for specifying silicone is simply that silicone lube is extremely water resistant - most ordinary greases are not - and this is an application that will be exposed to much water during the cable's life. Note that the desired silicone lube is a thick GREASE and spray silicones will not work. BTW since the major failure point on these cable seems to be at the lever end, when the pivot block doesn't pivot causing the cable to flex to sharply, relubing the pivot block and checking that it is free occasionally might be a good idea to prolong cable life.
- The "Extra Washer trick" - some sources recommend taking the washer that goes between the rubber knob and the firewall off the old cable and doubling it up over the new one as per the Saab SB to slightly tighten the cable. The SB recommends doing this only in response to problems obtaining adjustment, but some feel it is a good idea any time you put a new cable on an old clutch.
posted by 64.35.195...
No Site Registration is Required to Post - Site Membership is optional (Member Features List), but helps to keep the site online
for all Saabers. If the site helps you, please consider helping the site by becoming a member.
 |
 |
 |
 |
 |