1994-2002 [Subscribe to Daily Digest] |

I just printed Kyle's cable replacement directions and did the job the other day, and I've gotta say it was not nearly as difficult as I thought it would be. Total time was about 45 minutes, and I'm not a mechanic. Let me clear up a couple of things, which might help to put somebody a little more at ease about doing the job themselves.
First of all, I really appreciated having these directions here, in full, to work with. Kyle, you did a great job posting this for us.
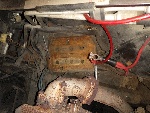
Okay, starting under the hood, everything is straightforward, just get the cable loose from the clutch lever and it'll be all slack for you to work with under the dash. Going inside the car, I really expected some major difficulty getting past the heater ducts, but it was not a problem at all. First, once all the dash parts are out of the way, just go ahead and remove the three screws holding the fuse box on so that it's plenty loose. Then undo the smaller heater duct in front just how Kyle says, then with the large one, do not hesitate to loosen up the screws on the white plastic block which sits directly behind the large duct. Just use a long, slim phillips screwdriver and don't lose the screws. This will give you the play you need to undo the LEFT side of the large duct, so you can pull it down a little bit. PLEASE!--DO NOT DEFORM EITHER DUCT IF YOU CAN HELP IT! They are stiff, but thin, plastic, and can be worked out if gentle, steady rocking pressure is used. Take your time. If you have some of those grippy, thin mechanics gloves, this is a good time to use them. Use a hair dryer to soften them up a bit if you must, but you DO NOT want these things going back together with a poor fit. Whistling noises, poor heater operation...imagine the hassle. The fuse box on the left end of the dash and the white fuse block are your major obstacles here, so just get them out of your way. They are not at all difficult to put back in place. Just keep in mind that you only need a couple inches to expose the top of the clutch pedal where the cable end is slipped over it.
Now, once the large heater duct is out of the way, go ahead and pull back the spring with the coathanger, just use a long one and attach it to the bottom of the seat mount (which should be moved all the way back for working room), and get that out of your way. Now you can see how the white plastic cable end is hooked over the pedal. Don't even try to reach up under the darn thing. Just work from the front to slip it off. I balanced my full-sized flashlight on the seat and shone it in there to see what I was doing. A really smart guy would just get a real light and hang it from the steering wheel or something, because you DO need light to see what you're doing. Now, depress the clutch pedal to pull the cable forward (toward the inside of the cab), and release it, which will leave the cable slack. Next, using a very long screwdriver or anything else which is stiff enough, narrow enough and long enough, just reach in there and pop that cable end off of the pedal. It'll take a few tries, and you may have to mash it just a litte bit between the hook on the top of the pedal and the surrounding bracket, but keep working at it, and when you get the pedal in just the right place and the tool under it, it'll come off pretty easy. It sure beats laying on your back and busting your knuckles trying to reach up in there.
Now, it's loose and you can pull it out from the firewall under the hood. The way it was routed between the brake lines, etc., I had to pull it down under the car, reaching behind the tire to get it out. It's just too stiff to bend it around all that stuff. And don't forget to detach it from the clip that is holding it to the left wheel well.
Anyhow, the installation is reverse of removal, and is a snap. Just don't lose any screws when you do the job, and make sure you put the correct screws back in where they came from. Following all greasing mandates is a good idea. And the next time you drive by the Saab shop, don't forget to stop in and ask them for a couple new plastic clips to replace the ones you had to destroy at the bottom of the dash panel. Have fun!
posted by 66.223.131...
No Site Registration is Required to Post - Site Membership is optional (Member Features List), but helps to keep the site online
for all Saabers. If the site helps you, please consider helping the site by becoming a member.
 |
 |
 |
 |
 |